LOCK any FOLDER without using any software

It is very easy to Lock any folder without use of any software. To lock any folder just follows following Steps as written in this post

1. Copy the Following Code to Notepad

cls
@ECHO OFF
title Folder Locker
if EXIST "Control Panel.{21EC2020-3AEA-1069-A2DD-08002B30309D}" goto UNLOCK
if NOT EXIST Locker goto MDLOCKER
:CONFIRM
echo Are you sure u want to Lock the folder(Y/N)
set/p "cho=>"
if %cho%==Y goto LOCK
if %cho%==y goto LOCK
if %cho%==n goto END
if %cho%==N goto END
echo Invalid choice.
goto CONFIRM
:LOCK
ren Locker "Control Panel.{21EC2020-3AEA-1069-A2DD-08002B30309D}"
attrib +h +s "Control Panel.{21EC2020-3AEA-1069-A2DD-08002B30309D}"
echo Folder locked
goto End
:UNLOCK
echo Enter password to Unlock folder
set/p "pass=>"
if NOT %pass%==type your password here goto FAIL
attrib -h -s "Control Panel.{21EC2020-3AEA-1069-A2DD-08002B30309D}"
ren "Control Panel.{21EC2020-3AEA-1069-A2DD-08002B30309D}" Locker
echo Folder Unlocked successfully
goto End
:FAIL
echo Invalid password
goto end
:MDLOCKER
md Locker
echo Locker created successfully
goto End
:End

2. Now, save the above file in NOTEPAD as “Locker.bat” in your computer

LOCK any FOLDER without using any software

LOCK any FOLDER without using any software

3. Now, whenever you will run this it will create a Folder named Locker in which you can store desired files in it and then by again running Locker.bat, you’ll be able to Lock the contents.

4. To unlock open Locker.bat again and it will be done!

Introduction

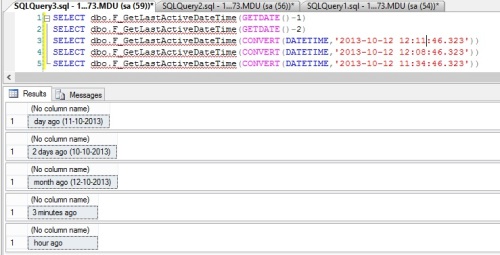
Many times there is requirement like to display last activity date and time smartly for last logged in, last message, last chat etc. So, I’ve created a function in MS SQL, which will return last activity date or time. This function will compare last date time with current date time that is ‘GETDATE()’ and will return result accordingly.

Output will be displayed in second, minute(s), hour(s), day(s), month(s), and in year(s) as shown below

———————————————————————————————————————————————————

Query: SELECT dbo.F_GetLastActiveDateTime(GETDATE()-1)

Result: day ago (11-10-2013)

———————————————————————————————————————————————————

Query: SELECT dbo.F_GetLastActiveDateTime(GETDATE()-2)

Result: 2 days ago (11-10-2013)

———————————————————————————————————————————————————

Query: SELECT dbo.F_GetLastActiveDateTime(CONVERT(DATETIME,’2013-10-12 12:04:46.323′))

Result: 2 minutes ago

———————————————————————————————————————————————————

Screenshot

Function smart Date or Time like Google and Facebook in MS SQL

Function to display smart Date or Time like Google and Facebook in MS SQL

Using the Code

CREATE FUNCTION [dbo].[F_GetLastActiveDateTime]
(
    -- Add the parameters for the function here
    @lastActiveDate Datetime
)
RETURNS varchar(30)
AS
    BEGIN
          DECLARE @LastActivity varchar(100)
          SET @LastActivity = '';
         -- Add the T-SQL statements to compute the return value here
         DECLARE @today datetime, @nowLastActiveDate datetime
         DECLARE @years int, @months int, @days int, @hours int, @minutes int, @seconds int, @h int, @m int, @s int 

         SELECT @today = GETDATE() 
         SELECT @nowLastActiveDate = DATEADD(year, DATEDIFF(year, @lastActiveDate, @today), @lastActiveDate) 

         SELECT @years = DATEDIFF(year, @lastActiveDate, @today) - (CASE WHEN @nowLastActiveDate > @today THEN 1 ELSE 0 END) 
         SELECT @months = MONTH(@today - @nowLastActiveDate) - 1 
         SELECT @days = DAY(@today - @nowLastActiveDate) - 1 

         SELECT @h = DATEDIFF(HOUR, @lastActiveDate, @today)
         SELECT @m = DATEDIFF(MINUTE, @lastActiveDate, @today)
         SELECT @s = DATEDIFF(SECOND, @lastActiveDate, @today)

         SET @hours = (@h%24)
         SET @minutes = (@m%60)
         SET @seconds = (@s%60) 

          SET @LastActivity =
         (CASE 
         WHEN @years = 1 THEN ' year ago (' + convert(varchar, @lastActiveDate, 105) + ')'
         WHEN @years > 1 THEN convert(varchar(3),@years) + ' years ago (' + convert(varchar, @lastActiveDate, 105) + ')'
         WHEN @months > 1 THEN ' month ago (' + convert(varchar, @lastActiveDate, 105) + ')'
         WHEN @months = 1 THEN convert(varchar(3),@months) + ' months ago (' + convert(varchar, @lastActiveDate, 105) + ')'
         WHEN @days = 1 THEN ' day ago (' + convert(varchar, @lastActiveDate, 105) + ')'
         WHEN @days > 1 THEN convert(varchar(3),@days) + ' days ago (' + convert(varchar, @lastActiveDate, 105) + ')'
         WHEN @hours = 1 THEN ' hour ago'
         WHEN @hours > 1 THEN convert(varchar(3),@hours) + ' hours ago'
         WHEN @minutes = 1 THEN ' minute ago'
         WHEN @minutes > 1 THEN convert(varchar(3),@minutes) + ' minutes ago'
         WHEN @seconds = 1 THEN ' second ago'
         WHEN @seconds > 1 THEN convert(varchar(3),@seconds) + ' seconds ago'
        ELSE convert(varchar, @lastActiveDate, 105)
    END)

    RETURN @LastActivity;
END

Split comma separated values in MS Sql

Posted: October 10, 2013 in SQL

Introduction

Manytimes there is requirement where we have to send values to Sql stored procedure using parameter. Suppose we have to store value from CheckListBox having 10 items to Database, One way is to run loop one by one and pass parameter to sql stored procedure, in this case system will connect to sql 10 times (in our example). Other way is to create a string with comma(‘,’) separated and pass it to sql stored procedure in single parameter and then split it into sql query.

For that we can use Split function and we can use the data in the way we want.

Split function of SQL Server is not in-built function,We have to add it manually in our Table-valued function as you can find the function below.

Using the Code

CREATE FUNCTION [dbo].[Split] 
(
     @InputString VARCHAR(8000),
     @Delimiter VARCHAR(50)
)
RETURNS @Items TABLE 
(
     Item VARCHAR(8000)
)
AS
BEGIN
     IF @Delimiter = ' '
     BEGIN
          SET @Delimiter = ','
          SET @InputString = REPLACE(@InputString, ' ', @Delimiter)
     END
     IF (@Delimiter IS NULL OR @Delimiter = '')
     SET @Delimiter = ','
     --INSERT INTO @Items VALUES (@Delimiter) -- Diagnostic
     --INSERT INTO @Items VALUES (@InputString) -- Diagnostic
     DECLARE @Item VARCHAR(8000)
     DECLARE @ItemList VARCHAR(8000)
     DECLARE @DelimIndex INT
     SET @ItemList = @InputString
     SET @DelimIndex = CHARINDEX(@Delimiter, @ItemList, 0)
     WHILE (@DelimIndex != 0)
     BEGIN
          SET @Item = SUBSTRING(@ItemList, 0, @DelimIndex)
          INSERT INTO @Items VALUES (@Item)
          -- Set @ItemList = @ItemList minus one less item
          SET @ItemList = SUBSTRING(@ItemList, @DelimIndex+1, LEN(@ItemList)-@DelimIndex)
          SET @DelimIndex = CHARINDEX(@Delimiter, @ItemList, 0)
     END -- End WHILE
     IF @Item IS NOT NULL -- At least one delimiter was encountered in @InputString
     BEGIN
          SET @Item = @ItemList
          INSERT INTO @Items VALUES (@Item)
     END
     -- No delimiters were encountered in @InputString, so just return @InputString
     ELSE INSERT INTO @Items VALUES (@InputString)
     RETURN
     END -- End Function

How to Use ?

Create above function in MS SQL, it is a Table Valued Function.

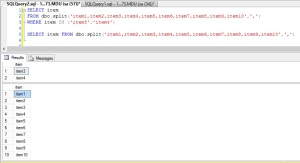
Ex. if there are 10 items like item1, item2,……item10 then

SELECT item FROM dbo.split(‘item1,item2,item3,item4,item5,item6,item7,item8,item9,item10′,’,’)

Output will be

item1
item2
item3
item4
item5
item6
item7
item8
item9
item10

Screenshot

Function to Split comma separated values in MS Sql

Function to Split comma separated values in MS Sql

Get Database Size in MS SQL Server

Posted: October 5, 2013 in SQL

MS SQL Database Size in KB, MB and GB

There are couple of different ways of get Database size. One of them is given below which shows the DB Id, Database Name, Database Logical Name, File Size in KB, MB and GB. This shows size for both .mdf and .ldf file.

SELECT
     db.[dbid] as 'DB ID',
     db.[name] as 'Database Name',
     af.[name] as 'Database Logical Name',
     af.[size] * 8 as 'File Size (KB)',
     CAST((((CAST(af.[size] as DECIMAL(18,4)) * 8192) /1024) /1024) AS DECIMAL(18,4)) as 'File Size (MB)',
     CAST(((((CAST(af.[size] as DECIMAL(18,4)) * 8192) /1024) /1024) /1024) AS DECIMAL(18,4)) as 'File Size (GB)', 
     af.[filename] as 'Physical Name'
FROM 
     SYS.SYSDATABASES db
     INNER JOIN SYS.SYSALTFILES af ON db.dbid = af.dbid

Function to Get Current Age in MS SQL

Posted: October 1, 2013 in SQL

Introduction

Many times we need to calculate user or client age in our requirement. So, I’ve created a function to calculate someone’s age in years, months, and days (best way).

Screenshot

Calculate User Age in SQL

Calculate User Age in SQL

Using the Code

Copy and page the below function in SQL and you can use it as show below just you have to pass only DATE to function.

—————————————————————————————–

SELECT dbo.f_getage(CONVERT(DATETIME,’19/07/1983′,105))

—————————————————————————————–

CREATE FUNCTION [dbo].[F_GetAge]
(
      -- Add the parameters for the function here
      @dayOfBirth Datetime
)
RETURNS varchar(50)
AS
BEGIN
      -- Declare the return variable here
      DECLARE @Age varchar(50)
      SET @Age = '';
      -- Add the T-SQL statements to compute the return value here
      DECLARE @today datetime, @thisYearBirthDay datetime
      DECLARE @years int, @months int, @days int 
      SELECT @today = GETDATE() 
      SELECT @thisYearBirthDay = DATEADD(year, DATEDIFF(year, @dayOfBirth, @today), @dayOfBirth) 
      SELECT @years = DATEDIFF(year, @dayOfBirth, @today) - (CASE WHEN @thisYearBirthDay > @today THEN 1 ELSE 0 END) 
      SELECT @months = MONTH(@today - @thisYearBirthDay) - 1 
      SELECT @days = DAY(@today - @thisYearBirthDay) - 1 
      SET @Age = convert(varchar(3),@years) + ' Years ' + convert(varchar(3),@months) + ' Months ' + convert(varchar(3),@days) + ' days'
     -- Return the result of the function
     RETURN @Age
END

Introduction

A scalable web application uses paging techniques to load large data. Paging enables a web-application to efficiently retrieve only the specific rows it needs from the database, and avoid having to pull back dozens, hundreds, or even thousands of results to the web-server. Today I am going to demonstrate how a custom paging can be implemented in asp.net application. It is a very essential approach to use paging technique in applications where lot of data to be loaded from database. Using a good paging technique can lead to significant performance wins within your application (both in terms of latency and throughput), and reduce the load on your database.

Custom Paging in Gridiew

Custom Paging in Gridiew

Background

I’ve seen many times where paging is required and developers gets stuck when there is large amount of data to be displayed in Gridview and other controls. For small amount of data it is ok if we use standard paging of gridview but in case of large data i.e. in millions then it takes lots of time to fetch data from Database. So I’ve decided to build user control for Paging. This controls provides the following features:

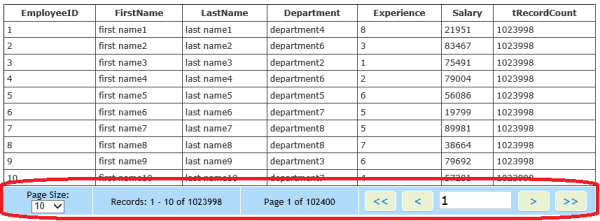
  1. First, Next, Last, Previous along with, user can go to any page by putting page no. in Paging TextBox. This feature is not available in traditional Gridview and other third party control, to move on specific page user has to click on next..next..or page no. button every time till the page is reached.
  2. This control will display Current and No. of Total Pages. Ex. Page No. 2 of 23
  3. This control will display starting and ending row no. of current page and Total No. of rows. Ex. Records 11-20 of 1234
  4. User can select Page Size i.e. No. of rows displayed in page i.e. 10, 20, 50, 100
  5. Very Important is Performance. It doesn’t matter how many rows in tables. It will fetch only those rows selected in page size. User has to pass only PageIndex and PageSize only in procedure.
  6. Note: This Paging control is tested on table having more than 1 Million rows. This will be very helpful where it has to display large no. of data in Gridview.

Using the Code

Step 1: Add ASCX page in your Project and name it GridViewPaging.ascx

Step 2: Copy and paste the below style css on GridViewPaging.ascx markup page.

<style type="text/css">
      .navigationButton {
      -webkit-box-shadow: rgba(0,0,0,0.2) 0 1px 0 0;
      -moz-box-shadow: rgba(0,0,0,0.2) 0 1px 0 0;
      box-shadow: rgba(0,0,0,0.2) 0 1px 0 0;
      border-bottom-color: #333;
      border: 1px solid #ffffff;
      background-color: #EAF2D3;
      border-radius: 5px;
      -moz-border-radius: 5px;
      -webkit-border-radius: 5px;
      color: #0d76c3;
      font-family: 'Verdana',Arial,sans-serif;
      font-size: 14px;
      text-shadow: #b2e2f5 0 1px 0;
      padding: 5px;
      cursor: pointer;
 }
.tablePaging {
      font-family: "Trebuchet MS", Arial, Helvetica, sans-serif;
      width: 100%;
      border-collapse: collapse;
 }
.tablePaging td {
      font-size: 1em;
      border: 1px solid #ffffff;
      padding: 3px 7px 2px 7px;
      background-color: #b1dbfa;
      font-size: 10pt;
 } 
</style>

Step 3: Copy and paste the below HTML on GridViewPaging.ascx markup page.

<table class="tablePaging">
 <tr>
     <td style="width: 15%; text-align: center;">
     <asp:Label ID="lblPageSize" runat="server" Text="Page Size: "></asp:Label>
     <asp:DropDownList ID="PageRowSize" runat="server">
          <asp:ListItem Selected="True">10</asp:ListItem>
          <asp:ListItem>20</asp:ListItem>
          <asp:ListItem>50</asp:ListItem>
          <asp:ListItem>100</asp:ListItem>
    </asp:DropDownList>
 </td>
 <td style="width: 25%; text-align: center;">
     <asp:Label ID="RecordDisplaySummary" runat="server"></asp:Label></td>
 <td style="width: 20%; text-align: center;">
     <asp:Label ID="PageDisplaySummary" runat="server"></asp:Label></td>
 <td style="width: 40%; text-align: center;">
     <asp:Button ID="First" runat="server" Text="<<" Width="45px" OnClick="First_Click" CssClass="navigationButton" />&nbsp;
     <asp:Button ID="Previous" runat="server" Text="<" Width="45px" OnClick="Previous_Click" CssClass="navigationButton" />&nbsp;
     <asp:TextBox ID="SelectedPageNo" runat="server" BorderColor="#CCCCCC" BorderStyle="Solid" BorderWidth="1px" Font-       
     Names="Verdana" Font-Size="Large" OnTextChanged="SelectedPageNo_TextChanged" Width="100px" AutoPostBack="True"   
     MaxLength="8"></asp:TextBox>&nbsp;
     <asp:Button ID="Next" runat="server" Text=">" Width="45px" OnClick="Next_Click" CssClass="navigationButton" />&nbsp;
     <asp:Button ID="Last" runat="server" Text=">>" Width="45px" OnClick="Last_Click" CssClass="navigationButton" />&nbsp; 
 </td>
 </tr>
 <tr id="trErrorMessage" runat="server" visible="false">
     <td colspan="4" style="background-color: #e9e1e1;">
     <asp:Label ID="GridViewPagingError" runat="server" Font-Names="Verdana" Font-Size="9pt" ForeColor="Red"></asp:Label>
     <asp:HiddenField ID="TotalRows" runat="server" Value="0" />
     </td>
 </tr>
</table>

Step 4: Copy and paste the below code in Code behind (server side code) on GridViewPaging.ascx page.

public EventHandler pagingClickArgs;
protected void Page_Load(object sender, EventArgs e)
{
    try
    {
         trErrorMessage.Visible = false;
         if (!IsPostBack)
         {
             SelectedPageNo.Text = "1";
             GetPageDisplaySummary();
         } 
     }
     catch (Exception ex)
     {
        ShowGridViewPagingErrorMessage(ex.Message.ToString());
      }
 }
protected void First_Click(object sender, EventArgs e)
{
    try
    {
         if(!IsValid()) {return;};
         SelectedPageNo.Text = "1";
         GetPageDisplaySummary();
         pagingClickArgs(sender, e);
    }
    catch (Exception ex)
    {
       ShowGridViewPagingErrorMessage(ex.Message.ToString());
    }
 }
protected void Previous_Click(object sender, EventArgs e)
 {
     try
     {
        if (!IsValid()) { return; };
        if (Convert.ToInt32(SelectedPageNo.Text) > 1)
        {
            SelectedPageNo.Text = (Convert.ToInt32(SelectedPageNo.Text) - 1).ToString();
        }
        GetPageDisplaySummary();
        pagingClickArgs(sender, e);
     }
     catch (Exception ex)
     {
         ShowGridViewPagingErrorMessage(ex.Message.ToString());
      }
 }
protected void SelectedPageNo_TextChanged(object sender, EventArgs e)
 {
     try
     {
         if (!IsValid()) { return; };
         int currentPageNo = Convert.ToInt32(SelectedPageNo.Text);
         if (currentPageNo < GetTotalPagesCount())
         {
            SelectedPageNo.Text = (currentPageNo).ToString();
         }
         GetPageDisplaySummary();
         pagingClickArgs(sender, e);
     }
     catch (Exception ex)
     {
        ShowGridViewPagingErrorMessage(ex.Message.ToString());
     }
 }
protected void Next_Click(object sender, EventArgs e)
 {
     try
     {
        if (!IsValid()) { return; };
        int currentPageNo = Convert.ToInt32(SelectedPageNo.Text);
        if (currentPageNo < GetTotalPagesCount())
        {
            SelectedPageNo.Text = (currentPageNo + 1).ToString();
        }
        GetPageDisplaySummary();
        pagingClickArgs(sender, e);
     }
     catch (Exception ex)
     {
          ShowGridViewPagingErrorMessage(ex.Message.ToString());
     }
 }
protected void Last_Click(object sender, EventArgs e)
 {
     try
     {
         if (!IsValid()) { return; };
         SelectedPageNo.Text = GetTotalPagesCount().ToString();
         GetPageDisplaySummary();
         pagingClickArgs(sender, e);
     }
     catch (Exception ex)
     {
         ShowGridViewPagingErrorMessage(ex.Message.ToString());
     }
 }
private int GetTotalPagesCount()
 {
      try
      {
            int totalPages = Convert.ToInt32(TotalRows.Value) / Convert.ToInt32(PageRowSize.SelectedValue); 
            // total page item to be displyed
            int pageItemRemain = Convert.ToInt32(TotalRows.Value) % Convert.ToInt32(PageRowSize.SelectedValue); 
            // remaing no of pages
           if (pageItemRemain > 0)// set total No of pages
           {
              totalPages = totalPages + 1;
           }
           else
           {
              totalPages = totalPages + 0;
           }
           return totalPages;
        }
        catch (Exception ex)
        {
              throw ex;
         }
 }
private void GetPageDisplaySummary()
 {
 try
 {
    PageDisplaySummary.Text = "Page " + SelectedPageNo.Text.ToString() + " of " + GetTotalPagesCount().ToString();
    int startRow = (Convert.ToInt32(PageRowSize.SelectedValue) * (Convert.ToInt32(SelectedPageNo.Text) - 1)) + 1;
    int endRow = Convert.ToInt32(PageRowSize.SelectedValue) * Convert.ToInt32(SelectedPageNo.Text);
    int totalRecords = Convert.ToInt32(TotalRows.Value);
    if (totalRecords >= endRow)
    {
                RecordDisplaySummary.Text = "Records: " + startRow.ToString() + " - " + endRow.ToString() + " of " + totalRecords.ToString();
    }
    else
    {
          RecordDisplaySummary.Text = "Records: " + startRow.ToString() + " - " + totalRecords.ToString() + " of " + totalRecords.ToString();
    }
 }
 catch (Exception ex)
 {
 throw ex;
 }
 }
private bool IsValid()
 {
    try
    {
       if (String.IsNullOrEmpty(SelectedPageNo.Text.Trim()) || (SelectedPageNo.Text == "0"))
       {
          SelectedPageNo.Text = "1";
          return false;
       }
      else if (!IsNumeric(SelectedPageNo.Text))
      {
         ShowGridViewPagingErrorMessage("Please Insert Valid Page No.");
         return false;
      }
      else
      {
         return true;
      }
  }
  catch (FormatException)
  {
    return false;
  }
 }
private bool IsNumeric(string PageNo)
 {
    try
    {
       int i = Convert.ToInt32(PageNo);
       return true;
     }
    catch (FormatException)
    {
       return false;
    }
 }
private void ShowGridViewPagingErrorMessage(string msg)
 {
    trErrorMessage.Visible = true;
    GridViewPagingError.Text = "Error: " + msg;
 }

Step 5: Create table with the column name shown in below Procedure and Create below procedure in your SQL database.

——————————————————————————————-

Create table and name it EmployeeList

CREATE TABLE [dbo].[EmployeeList]

(
[EmployeeID] [bigint] IDENTITY(1,1) NOT NULL,
[FirstName] [varchar](200) NOT NULL,
[LastName] [varchar](200) NOT NULL,
[Department] [varchar](200) NOT NULL,
[Experience] [decimal](18, 0) NOT NULL,
[Salary] [decimal](18, 0) NOT NULL,
CONSTRAINT [PK_EmployeeList] PRIMARY KEY CLUSTERED
(
[EmployeeID] ASC
)
)

Run below query to insert 1 Million test rows into above table

This will take some time to insert data. Later on you can do indexing etc. whatever you required

DECLARE @i bigint = 0
WHILE (@i<100000)
BEGIN
SET @i= @i+1;
INSERT INTO EmployeeList1(FirstName,LastName,Department,Experience,Salary)
VALUES(‘FirstName_’ + convert(varchar,@i), ‘LastName_’ + convert(varchar,@i),’Department_’ + convert(varchar,@i),@i,@i)
END

——————————————————————————————-

CREATE procedure [dbo].[CustomPaging]

@pageIndex int = 0,
@pageSize int = 0
As
BEGIN
 SET NOCOUNT ON;

 /* Set Starting Row Index and Ending Row Index */
 -------------------------------------------------
 declare @startRowIndex int = 0
 SET @startRowIndex = (@pageIndex * @pageSize)+ 1

 declare @endRowIndex int = 0
 SET @endRowIndex = (@startRowIndex + @pageSize - 1)

 /* recordCount required for paging in front end */
 declare @recordCount int = 0 
 SET @recordCount=0
 -------------------------------------------------

 Select @recordCount=count(*) from EmployeeList A WITH (NOLOCK)

 Select EmployeeID, FirstName, LastName, Department, Experience, Salary, tRecordCount
 From 
 (
     Select A.EmployeeID, A.FirstName, A.LastName, A.Department, A.Experience, A.Salary,
     ROW_NUMBER() OVER(ORDER BY A.EmployeeID) as RowNum, @recordCount as tRecordCount
     from EmployeeList A WITH (NOLOCK)
 ) as temp 
 WHERE RowNum BETWEEN @startRowIndex AND @endRowIndex

END

Step 6: Add new ASPX page in your project and name it CustomPaging.aspx

Step 7: Copy and paste below code on  CustomPaging.aspx Markup.

Add below code in top or if you drag and drop GridViewPaging control on this page it will be created automatically

<%@ Register Src="~/GridViewPaging.ascx" TagPrefix="uc1" TagName="GridViewPaging" %>
<form id="form1" runat="server">
   <div>
       <asp:GridView ID="GridView1" runat="server" CellPadding="4" Font-Names="Verdana" Font-Size="9pt" Width="100%" AllowPaging="True" ForeColor="#333333" GridLines="Both"></asp:GridView>
       <uc1:GridViewPaging runat="server" id="GridViewPagingControl" />
   </div>
 </form>

Step 8: Copy and paste below code on CustomPaging.aspx code behind.

 protected void Page_Load(object sender, EventArgs e)
 { 
    //---------------------------------------------------------------------
    //Step 1: Bind Grid On Page Load
    //---------------------------------------------------------------------
    if (!Page.IsPostBack)
    {
        dataBind(); 
    }
    //---------------------------------------------------------------------
    //Step 2: Event Handler for First, Previous, Next and Last Button Click
    //---------------------------------------------------------------------
     GridViewPagingControl.pagingClickArgs += new EventHandler(Paging_Click);

 }

 //--------------------------------------------------------------------------------------------------------
 // Step 3: Add Below Function which gets call on User Controls First, Previous, Next and Last Button Click
 //--------------------------------------------------------------------------------------------------------
 private void Paging_Click(object sender, EventArgs e )
 {
     GridView1.PageSize = Convert.ToInt32(((DropDownList)GridViewPagingControl.FindControl("PageRowSize")).SelectedValue); 
     GridView1.PageIndex = Convert.ToInt32(((TextBox)GridViewPagingControl.FindControl("SelectedPageNo")).Text) - 1;
     dataBind();
}
private void dataBind()
 {
    SqlConnection connSql = new SqlConnection("Server=SERVERNAME;Database=DATABASENAME;uid=USERID;pwd=PASSWORD");
    DataSet ds = new DataSet();
    SqlCommand cmdSql = new SqlCommand();
    cmdSql.Connection = connSql; 
    cmdSql.CommandType = System.Data.CommandType.StoredProcedure;
    cmdSql.CommandText = "CustomPaging"; 

    //---------------------------------------------------------------------------------
    //Step 4: Pass two Parameter @pageIndex and @pageSize to SQL Procedure
    //---------------------------------------------------------------------------------
    cmdSql.Parameters.Add(new SqlParameter("@pageIndex", GridView1.PageIndex));
    cmdSql.Parameters.Add(new SqlParameter("@pageSize", GridView1.PageSize));
    connSql.Open();
    SqlDataAdapter da = new SqlDataAdapter(cmdSql); 
    da.Fill(ds);

    if (ds.Tables[0].Rows.Count != 0)
    {
    //---------------------------------------------------------------------------------
    //Step 5: Store No. of Total Rows in Hidden Field which is situated in User Control
    //---------------------------------------------------------------------------------
((HiddenField)GridViewPagingControl.FindControl("TotalRows")).Value = ds.Tables[0].Rows[0]["tRecordCount"].ToString();
    }

    GridView1.DataSource = ds;
    GridView1.DataBind();
    connSql.Close(); 
 }

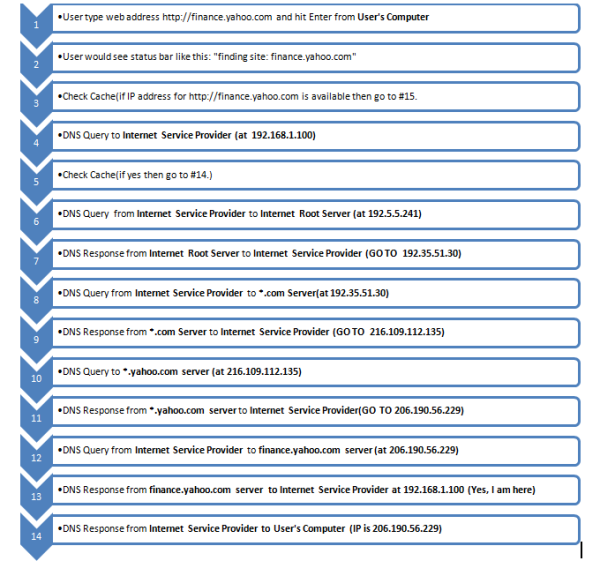
Web Request Life Cycle

Posted: September 27, 2013 in Nice to read
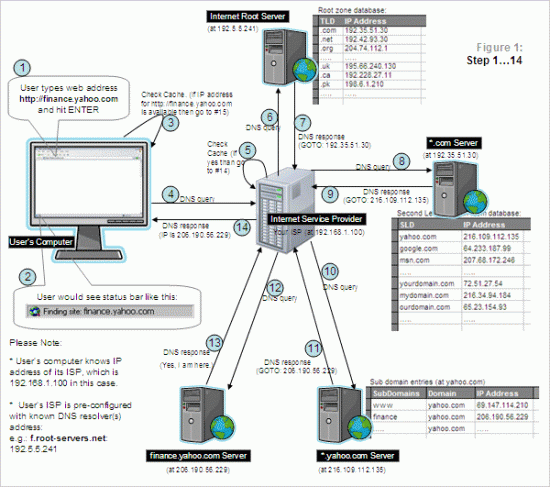
Web Request Life Cycle Behind The Scene

Web Request Life Cycle Behind The Scene

  1. User type web address http://finance.yahoo.com and hit Enter from User’s Computer
  2. User would see status bar like this: “finding site: finance.yahoo.com”
  3. Check Cache(if IP address for http://finance.yahoo.com is available then go to #15.
  4. DNS Query from User’s Computer to Internet Service Provider (at  192.168.1.100)
  5. Check Cache(if yes then go to #14.)
  6. DNS Query  from Internet Service Provider to Internet Root Server (at 192.5.5.241)
  7. DNS Response from Internet Root Server to Internet Service Provider (GO TO  192.35.51.30)
  8. DNS Query from Internet Service Provider to *.com Server(at 192.35.51.30)
  9. DNS Response from *.com Server to Internet Service Provider (GO TO  216.109.112.135)
  10. DNS Query from Internet Service Provider to *.yahoo.com server (at 216.109.112.135)
  11. DNS Response from *.yahoo.com server to Internet Service Provider(GO TO 206.190.56.229)
  12. DNS Query from Internet Service Provider to finance.yahoo.com server (at 206.190.56.229)
  13. DNS Response from finance.yahoo.com server  to Internet Service Provider at 192.168.1.100 (Yes, I am here)
  14. DNS Response from Internet Service Provider to User’s Computer (IP is 206.190.56.229)
Web Request Life Cycle Steps

Web Request Life Cycle Steps

Problem
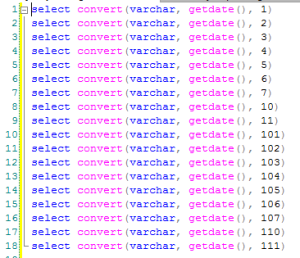
There are many instances when dates and times don’t show up at your doorstep in the format you’d like it to be, nor does the output of a query fit the needs of the people viewing it. One option is to format the data in the application itself. Another option is to use the built-in functions SQL Server provides to format the date string for you.

Different Data Format in MS SQL

Different Data Format in MS SQL

Solution
SQL Server provides a number of options you can use to format a date/time string. One of the first considerations is the actual date/time needed. The most common is the current date/time using getdate(). This provides the current date and time according to the server providing the date and time. If a universal date/time is needed, then getutcdate() should be used. To change the format of the date, you convert the requested date to a string and specify the format number corresponding to the format needed. Below is a list of formats and an example of the output:

Format Query Output
1 select convert(varchar, getdate(), 1) 09/27/13
2 select convert(varchar, getdate(), 2) 13.09.27
3 select convert(varchar, getdate(), 3) 27/09/13
4 select convert(varchar, getdate(), 4) 27.09.13
5 select convert(varchar, getdate(), 5) 27-09-13
6 select convert(varchar, getdate(), 6) 27 Sep 13
7 select convert(varchar, getdate(), 7) Sep 27, 13
10 select convert(varchar, getdate(), 10) 09-27-13
11 select convert(varchar, getdate(), 11) 13/09/27
101 select convert(varchar, getdate(), 101) 09/27/2013
102 select convert(varchar, getdate(), 102) 2013.09.27
103 select convert(varchar, getdate(), 103) 27/09/2013
104 select convert(varchar, getdate(), 104) 27.09.2013
105 select convert(varchar, getdate(), 105) 27-09-2013
106 select convert(varchar, getdate(), 106) 27 Sep 2013
107 select convert(varchar, getdate(), 107) Sep 27, 2013
110 select convert(varchar, getdate(), 110) 09-27-2013
111 select convert(varchar, getdate(), 111) 2013/09/27

Different Time Formats

Format Query Output
8 or 108 select convert(varchar, getdate(), 8) 00:38:54
9 or 109 select convert(varchar, getdate(), 9) Sep 27 2013 12:38:54:840AM
14 or 114 select convert(varchar, getdate(), 14) 00:38:54:840

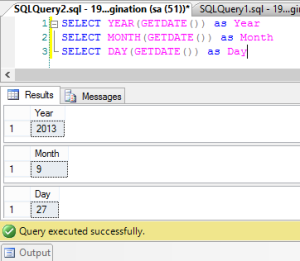
Get YEAR, MONTH and DAY

SELECT YEAR(GETDATE()) –2013
SELECT MONTH(GETDATE()) –09
SELECT DAY(GETDATE()) –27

Get Year Month Day in MS SQL

Get Year Month Day in MS SQL

You can also format the date or time without dividing characters, as well as concatenate the date and time string:

Sample statement Output
select replace(convert(varchar, getdate(),101),’/’,”) 12302006
select replace(convert(varchar, getdate(),101),’/’,”) + replace(convert(varchar, getdate(),108),’:’,”) 12302006004426

Database Driven Dynamic Menu Control

Posted: September 26, 2013 in ASP.NET

Introduction

As everyone knows, Menu is an important control in Visual Studio which is used in web based applications. Displaying hard coded or static menu on a web page is very easy, but showing menu on page dynamically is somewhat tricky. So I’ve decided to write some code which displays menu dynamically on page and also which is database driven.

Background

I’ve seen many developers who are in need of creating database driven dynamic menu and proper solution when code is not available. Many solutions are available, but up to 1 or 2 level hierarchy of menu. As shown in the below image, it is N-level Database Driven Dynamic Menu. This article will be very helpful for those who are looking for database driven dynamic menu. One can explore it more and more with user role or as per requirement.

Using the Code

Step 1: Create a Table in SQL as script given below

CREATE TABLE [dbo].[menuMaster]
(
	[menu_id] [int] NOT NULL,
	[menu_name] [varchar](100) NOT NULL,
	[menu_parent_id] [int] NULL,
	[menu_url] [varchar](50) NULL,
        CONSTRAINT [PK_menuMaster] PRIMARY KEY CLUSTERED
	(
		[menu_id] ASC
	)
)

In the above table, menu_id is a unique incremental id which is Child Menu and menu_parent_id is the Parent Menu. In the above table, Roles are not included for keeping the simplicity. One can add new columns as per requirement and can use them in any way.

Step 2: Insert data into Table menuMaster

Please execute the below script to insert data into menuMaster table so that you can quickly view the data, how we are using data and it will also save your time. In the data given below, you can view that menu_parent_id is NULLfor Root Menu. And for other menus, the parent id is mentioned in menu_parent_id column. Simply copy and paste in SQL editor and execute it.

insert into menuMaster values(1,'Home',NULL,NULL)
insert into menuMaster values(2,'Services',NULL,NULL)
insert into menuMaster values(3,'Products',NULL,NULL)
insert into menuMaster values(4,'Partners',NULL,NULL)
insert into menuMaster values(5,'Training',NULL,NULL)
insert into menuMaster values(6,'Resources',NULL,NULL)
insert into menuMaster values(7,'Support',NULL,NULL)
insert into menuMaster values(8,'Logout',NULL,NULL)
insert into menuMaster values(9,'Digital Certificate',2,'#')
insert into menuMaster values(10,'e-Procurement',2,'#')
insert into menuMaster values(11,'e-Governance',2,'#')
insert into menuMaster values(12,'Data Center',2,'#')
insert into menuMaster values(13,'CCTV & Surveillence',2,'#')
insert into menuMaster values(14,'Cloud Computing',2,'#')
insert into menuMaster values(15,'Test Procure',3,'#')
insert into menuMaster values(16,'Test Sign',3,'#')
insert into menuMaster values(17,'Test Tree',3,'#')
insert into menuMaster values(18,'Test Wrap',3,'#')
insert into menuMaster values(19,'Test Dorse',3,'#')
insert into menuMaster values(20,'Test Share',3,'#')
insert into menuMaster values(21,'Technology Partner',4,'#')
insert into menuMaster values(22,'Channel Partner',4,'#')
insert into menuMaster values(23,'Premium Partner',4,'#')
insert into menuMaster values(24,'Certificate Usage',5,'#')
insert into menuMaster values(25,'Download Procedure',5,'#')
insert into menuMaster values(26,'User Manual',5,'#')
insert into menuMaster values(27,'White Papers',6,'#')
insert into menuMaster values(28,'Download Drivers',6,'#')
insert into menuMaster values(29,'For DGFC Users',6,'#')
insert into menuMaster values(30,'Important Site Links',6,'#')
insert into menuMaster values(31,'Entrust',30,'http://www.entrust.com')
insert into menuMaster values(32,'CCA',30,'http://www.cca.gov.in')
insert into menuMaster values(33,'PKI Forum',30,'http://www.pkiforum.org')
insert into menuMaster values(34,'Telephonic Support',7,'#')
insert into menuMaster values(35,'FAQ',7,'#')
insert into menuMaster values(36,'Feedback',7,'#')

Step 3: Copy and paste the following CSS in file Named: TableTemplates.css

Below is the CSS which you have to copy and paste in TableTemplates.css file or whatever file name you want. But do not forgot to add a link of this CSS file on the master page or whatever page you are using menu control. You can add the below CSS on the page where you have placed the Menu control also. The best practice is to keep it in a separate file. The file is attached in zip format and can be downloaded from the link at the top of this article. The CSS is also given below.

.MenuBar { font-family: "Trebuchet MS", Arial, Helvetica, sans-serif; }

.StaticMenuItem 
{
    background-color: #1999cf;   -moz-border-radius: 1px;
    -webkit-border-radius: 1px;   font: 14pt calibri;
    font-family: "Trebuchet MS", Arial, Helvetica, sans-serif;
    margin: auto; vertical-align: middle; background-repeat: repeat-x;
    height: 70px; text-align: center; color: white; padding: 5px;
}

.StaticMenuItemStyle { color: #ffffff; padding: 20px; }

.StaticHoverStyle { background-color: #b6e390; color: #5f5f5f; }

.StaticSelectedStyle { background-color: #ffe99f; color: #5f5f5f; }

.DynamicMenuItemStyle 
{ 
    background-color: #bdeafe; border-width: 1px; border-style: solid;
    border-color: #000000; -moz-border-radius: 1px; -webkit-border-radius: 1px;
    font: 13pt calibri; margin: auto;border-left: 0px solid #c1c1c1; 
    border-right: 0px solid #c1c1c1; border-top: 0px solid #c1c1c1;
    border-bottom: 1px solid #c1c1c1; border-spacing: 0px;
    vertical-align: middle; background-repeat: repeat-x;
    height: 50px; text-align: left; color: #5f5f5f; padding: 5px;
}

.DynamicHoverStyle { background-color: #eca74c; color: #ffffff; }

Step 4 : Add Menu control on Master page

Adding Style Sheet Link on Master Page.

<head runat="server">
    <title>Database Driven Dynamic Control</title>
    <link rel="Stylesheet" href="TableTemplates.css" 
    type="text/css" />

</head>

Adding of menu control will look like this. 
In the below code, we have simply added the Menu control and for using the CSS, 
we have given different CSS for example 'StaticMenuStyle', etc.

<body>
    <form id="form1" runat="server">
        <div>
            <asp:Menu ID="menuBar" 
            runat="server" Orientation="Horizontal" 
Width="100%" 
CssClass="MenuBar" MaximumDynamicDisplayLevels="10">
                <StaticMenuStyle CssClass="StaticMenuItem" />
                <StaticMenuItemStyle CssClass="StaticMenuItemStyle" />
                <StaticHoverStyle CssClass="StaticHoverStyle" />  
                <StaticSelectedStyle CssClass="StaticSelectedStyle" />              
                <DynamicMenuItemStyle CssClass="DynamicMenuItemStyle" />
                <DynamicHoverStyle CssClass="DynamicHoverStyle" />
            </asp:Menu>
        </div>

    </form>
</body>

Step 5 : On page load, call the following function

Below is the code which you have to copy and paste in code behind.

protected void Page_Load(object sender, EventArgs e)
    {
        if (!IsPostBack)
        {
            GetMenuData();
        }
    }

I've written a function named GetMenuData() where I've written the core logic of Dynamic.

private void GetMenuData()
    {
        DataTable table = new DataTable();
        string strCon = System.Configuration.ConfigurationManager.ConnectionStrings
        ["cnstring"].ConnectionString;
        SqlConnection conn = new SqlConnection(strCon);
        string sql = "select menu_id, menu_name, menu_parent_id, menu_url from menuMaster";
        SqlCommand cmd = new SqlCommand(sql, conn);
        SqlDataAdapter da = new SqlDataAdapter(cmd);
        da.Fill(table);
        DataView view = new DataView(table);
        view.RowFilter = "menu_parent_id is NULL";
        foreach (DataRowView row in view)
        {
            MenuItem menuItem = new MenuItem(row["menu_name"].ToString(), 
            row["menu_id"].ToString());
            menuItem.NavigateUrl = row["menu_url"].ToString();
            menuBar.Items.Add(menuItem);
            AddChildItems(table, menuItem);
        }
    }

Calling method AddChildItem to fill menu up to N-level menu.

private void AddChildItems(DataTable table, MenuItem menuItem)
    {
        DataView viewItem = new DataView(table);
        viewItem.RowFilter = "menu_parent_id=" + menuItem.Value;
        foreach (DataRowView childView in viewItem)
        {
            MenuItem childItem = new MenuItem(childView["menu_name"].ToString(), 
            childView["menu_id"].ToString());
            childItem.NavigateUrl = childView["menu_url"].ToString();
            menuItem.ChildItems.Add(childItem);
            AddChildItems(table, childItem);
        }
    }

The only thing is you have to change the connection string in web.config file.

Note: A sample project zip file is attached. This project is built in VS2012 Express. But we can use menu control in any version.